There are a lot of custom templates available for Blogger that provide a wide range of customization, but what most of them lack is an edge to edge full-screen views illustrated in the above image, most of the custom templates available for Blogger do not cover the full-screen width in the homepage, posts and pages.
Thus, many bloggers find it difficult to make their Blogger/Blogspot blog full width in order to make it cover the entire screen and provide an attractive edge to edge viewing experience.
Unlike WordPress where almost everything can be changed and controlled using plugins, Blogger is mostly DIY (Do It Yourself) based, and thus, we need to manually change the source code of the template to get our desired changes.
In this article, I will show you a simple process by which you can make any Blogger template full width (edge to edge display) on any display, no matter how large the screen is.
Quick Fix Method
This method doesn’t work on all the templates. If it doesn’t work for you, skip to the next section where the full tutorial for making blogger template full width is given.
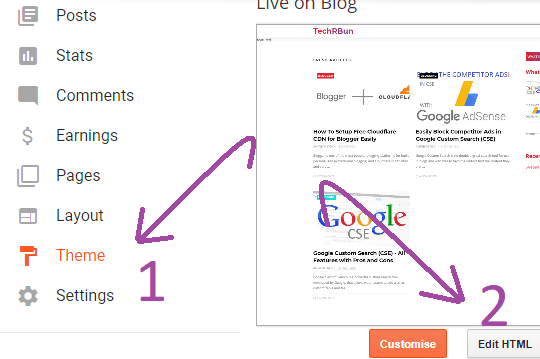
Go to Blogger –> Theme –> Edit HTML and copy the full code using CTRL+C.
Open Notepad and paste the code.
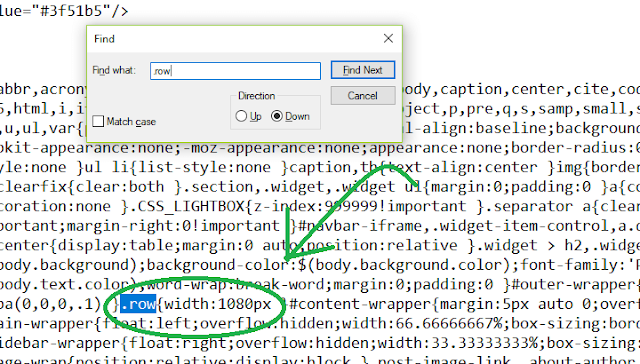
Press CTRL+F and search for “.row” (without quotes)
You will then find the line where the width of the row is defined. Replace the width value of the row with 100%, i.e. .row{width:100%}
Now copy the whole code from Notepad with CTRL+A and CTRL+C.
Go to the Blogger HTML editor and press CTRL+A to select the whole code and press DEL to delete it.
Now press CTRL+V to paste the new code. Now hit the SAVE button.
Your Blogger blog has now become full width! Congrats!
But what if this method doesn’t work for you? Well then your template doesn’t support the row variable, and in that case, please follow the full guide given below.
STEPS TO MAKE BLOGGER BLOG FULL WIDTH
0. Take A Backup Of The Source Code (Very Important)
Go to Blogger –> Theme –> Edit HTML.
Select the whole source code using CTRL + A, copy it using CTRL + C, paste it in Notepad and save it on the desktop.
This step is very important because if you accidentally follow the steps incorrectly, this backup file will help you to restore your blog to the previous form.
1. Head over to your website/blog
Open Google Chrome or any other browser that supports the Developers Tools function. Then go to your website/blog.
2. Inspect Size of the elements
Once your website is fully loaded, press the F12 key from your keyboard and the ‘inspect elements‘ box will appear at the right-hand side of the screen as shown in the image.
Click on the button shown in the image above and hover your mouse over the content of your blog which you want to make full width, as shown below.
Now you will be able to see max-width of your blog. Our aim is to change it to auto mode so that it fits edge to edge (full width) on any screen on which it is viewed.
Either remember or note down the current max-width value somewhere.
3. Make Changes To The Widths in The Source Code
Go to Blogger.com and click on Theme from the left bar and then click on Edit HTML, as shown below.
[IMPORTANT] PLEASE MAKE SURE THAT YOU TAKE A BACKUP OF THE SOURCE CODE AS SHOWN ABOVE, BEFORE PROCEEDING TO TWEAK IT.
Once the Edit HTML page has loaded, press CTRL + F to bring up the search box.
Search For The Width Variable In The Source Code
Search for the #outer-wrapper max-width value (in my case it is 1200) that you just inspected. Press Enter to see the search results.
Please note that in your template the variable name (max-width) might be different, but it will be somewhat similar, meaningful and recognizable.
Now you’ll have to make two changes, as you can see in the #outer-wrapper, there are two widths defined: max-width and width. Change both the values to auto as shown below. This will make your main blog content stretch up to the edge.
3. Make Changes To The Widths in The Source Code
Go to Blogger.com and click on Theme from the left bar and then click on Edit HTML, as shown below.
Once the Edit HTML page has loaded, press CTRL + F to bring up the search box.
Search For The Width Variable In The Source Code
Search for the #outer-wrapper max-width value (in my case it is 1200) that you just inspected. Press Enter to see the search results.
Please note that in your template the variable name (max-width) might be different, but it will be somewhat similar, meaningful and recognizable.
Now you’ll have to make two changes, as you can see in the #outer-wrapper, there are two widths defined: max-width and width. Change both the values to auto as shown below. This will make your main blog content stretch up to the edge.
Remember the value.
Edit Sidebar Width In Source Code
Again, go to Blogger –> Edit HTML.
Search for the sidebar width (300px in my case) which you inspected just now, from the source code in Edit HTML.
Replace the width value with 27% and remove float: right (if present)
It would then look like width:27%;
Do not make any other changes on that line.
Finally, click on Save changes.
Refresh your blog and verify that if it has become full width or not.
Hope this tutorial has helped you and you could make your blog full width successfully.
If not, please recheck that you followed all the above steps properly.
Open the backup text file from the desktop that you made in Step 0, select all the code, copy it and paste it in the HTML editor and click on Save changes.
Your blog will be restored to the previous format. Now, please follow all the steps again, more carefully.
If still, any problem persists, feel free to comment down your problem, and I will help you fix it, as soon as possible.
Done! Congratulations!
You’ve successfully made your blogger blog full width and now your blog will be displayed edge to edge (100% full width) on any screen, no matter how large or small it is.
Issue Still Not Fixed?
I understand it’s a bit confusing task to do, especially finding out the correct line of code where the change has to be made.
So, if you fail to fix it yourself even after many attempts, you can email me at anirban@techrbun.com with the HTML source code of your Blogger template, which you can obtain from Themes -> EDIT HTML.
I will fix your code and make your Blogger template full width for free, and e-mail you back the correct code.
Tired of slow indexing of your blog posts by Google? Check Out: How To Get Your Blog Posts Indexed By Google Instantly [2 Minutes]
You might also like: How to Correctly Setup Cloudflare Free CDN for Blogger + Features Review
Also check out: How to make Progressive Web App (PWA) for Blogger
Reblog: https://www.techrbun.com/make-blogger-full-width/
https://helplogger.blogspot.com/2014/08/blogger-header-footer-full-width.html


